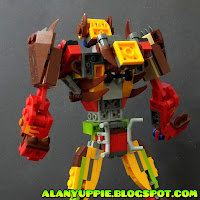
Every beginning of the year, I look forward to new LEGO sets and buy those I think I can build Transformers from. Usually a set or two from LEGO Creator fits the bill. And sometimes Ninjago too (sets with dragons).
When I first set my eyes of LEGO Movie 2: Set 70827 Ultrakitty and Warrior Lucy .. I knew prospects were pretty high there. I delayed my purchase until recently when I saw one to the tune of 20% off retail price.
The first 2 days of this project was a false start: I attempted to build a falcon , then a T-rex but with no success. I simply failed to get the groove to continue.
Initially I planned not to use any green and blue parts from the set since their colors clash with the rest of the parts... but I gave in.
One blue 4x4 plate was once used for this creation but this led to a jarring blue stripe on the beast collar that was quite obvious when posed like above. I then decided to remove that part and rebuilt the body.
The most challenging part from this project was building both the robot and beast head. due lack of transparent parts from the set that could be used for the eyes.
If you're kept wondering why I name this kitty as Razorkatty, well.. click here to find out!
Weaponize Now!
Unwilling to let extra leftover parts go to waste... (it looks like a mono-eyed squid, don't you think so? )
I tried very hard to find ways to peg this weapon onto his back using LEGO stud but lack of parts hindered my efforts. Most of the needed parts has already been used to build this beast.
Finally, with a stroke of luck and experimentation... it managed to be tucked between those flexible thorns snugly.
Unless I shake this beast mad or hold him upside down... the weapon probably won't fall off his back.
Transformation
The beast legs to robot legs technique was something I learnt from my project Giraffe and Rudolph last year.
Beast shoulders swiveled to another position befitting a bipedal humanoid.
Thorny beast back now folded to the back of the robot mode. The gray part on the thorn helps to prep up the shoulder joint .
The muzzle from the beast mode folded to the back of the robot mode, revealing the robot head.
Robot Mode
He has no (visible) mouth and emotionless face. That what makes him hard to predict.
Action Poses
Notice the blue round parts I used for the knuckles. Left one has a stud on top, and right one is an upside down stud . Keep browsing this page to find out why.
Bring Me My Squid!
Due to restricted blue parts... He's entitled to only one arm with studded knuckle to "hold" his rifle. The right knuckle has a studded part but connected upside down. Another blue part below that same knuckle is a tile . So that's all the blue parts for the set including spare ones.
The shoulder joint is took weak to hold the rifle straight up, really. The damn weapon is pretty heavy and bulky.
OK.. time to give him a break!
Together with my 2 recent creations, Titanicus and Tankhead . Getting all 3 of them in the same shot was a chore: The background is too small!!
Building Instructions
Due to large number of photos in this post here, I have decided to put the building instructions in a separate post. Please drop by my blog again about a week from now to get them! Thank You!!


Any update on when you'll post the instructions? I'm anxious to build this.
ReplyDeletecan you make the instructions for razorkitty please? i have both sets the tripple decker couch mecha and the ultrakatty set.
ReplyDeleteRazorkatty's a complicated one. I have snapped the photos of the building steps , but yet to organize them . Please hold on for at least 2 more weeks. Thanks ! =)
ReplyDeleteok.
Deletecan you make it early?
DeleteInstructions now available here!
Deletehttps://alanyuppie.blogspot.com/2019/09/instructions-for-lego-transformer.html
this guy looks like a repaint and slight remold of a transfomer from the movies
ReplyDelete