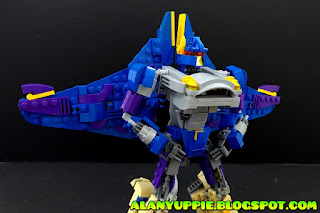
The dry spell is broken!!! After suffering from builders block for more than half a year, I finally managed to get my groove back!
If you have been following my blog/youtube/instagram long enough, you might noticed I did not built any new Transformers during the past 6 months (apart from those made using individual LEGO sets). The pandemic had been wreaking havoc on my mood as I am financially affected.
Finally I have decided to snap out of this and try to pick myself up again. So project Depth Charge was initiated almost two weeks ago and things moved at record speed!
About This Project
This is my contribution to a challenge in FB LEGO Transformers group to build a LEGO Beast Wars character. To be real frank, I seldom build Beast Wars characters due to lack of interests in them. However.... there's a handful of BW bots that I like (and used to own the toys as well). While you're here, check out my LEGO BW Dinobot too!
Depth Charge was chosen because of my initial spark of idea on his chest design , thanks to the LEGO part below:
I have a bunch of this part in green from Ninjago sets for ages but never able to utilize them in my creations.
I started the ball rolling by building the chest first, in various colors as usual. By day 5, I was ready to make my Bricklink order to acquire parts of the right colors to complete it.
While waiting for parts to arrive, I initiated yet another LEGO Project, codenamed Project Omega just to pass the time. (Follow my instagram for latest updates)
One of my biggest dilemma was the choice of optics color for the manta ray mode. The original toy featured a metallic gold body with yellow eyes. I hope my choice of yellow eyes still looks good on the tan colored body.
Making the tail flexible is one of the final changes I made.
These are called cephalic lobes (I almost name them feelers/stingers!)
Hope a sprinkle of pearl gold parts can compensate for lack of shine on the manta ray's head.
Depth Charge's shark drone/rifle is docked underneath.
SPACE CRUISER MODE
Remove the shark drone from under the body. (note the stud on the shark fin as connection point).
Fold the tail and fins up
Rotate the fins orientation. A sliver of blue curved panel folded out to be swiveled 180 degree to form a more curvy wings.
Both wings buckled when I place this mode on the ground. It looks much better hovering mid-air.
The tail detaches to become his sword
TRANSFORMATION TO ROBOT MODE
I used to own Depth Charge's toy and almost forgotten he have the drill feature. Luckily I discovered this just in time to modify the robot arms accordingly. There's a stud on each hand to allow weapons to be pegged on them.
Original toy of Depth Charge has a huge panel on the beast mode that ended up as his butt flap. I decided to delegate both panel halves to the legs instead.
The cephalic lobes flexibility allowed them to be folded away to the back of robot legs without me making additional modifications.
Note the faux lobes on the robot knees.
The connection of the back wing kibbles to the body are made possible by connecting "finger" parts to the jumper part stud holes.
ROBOT MODE
A picture tells a thousand words. I won't be making much commentary here and let each photo do the talking.
Yeah. My dilemma struck twice! I was torn also when it comes to the faux optics on his robot mode chest. The light orange claw piece I implemented above would be perfect if they're studless.
At this point, I discovered he looked better with wider wingspan. Maybe the folded wings were too close to the arms , hindering the articulations.
In robot mode, his arm drills can generate huge vortexes to deter enemies from getting near him.
WITH SWORD
Initially I created a very elaborate and big sword for him without considering the impact of its weight. So I was forced to simplify my design so the elbow joints can take the weight of this weapon and wield it.
WITH RIFLE
WITH BOTH WEAPONS


No comments:
Post a Comment