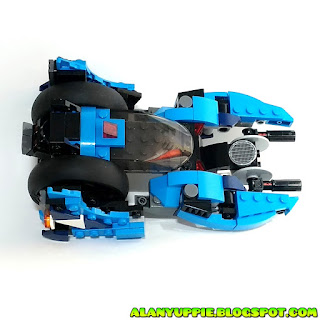
This is my second attempt in building a Transformer from LEGO Creator 31114: Superbike. My challenge this time around, is to make use of the huge bike tires in my creation.
PROLOGUE
Since this set doesn't come with ball joints, I managed to crank out an articulated Transformer few months ago (my first attempt with the set).
My first attempt above (click here if video is not showing)
However, the strength of the joints from this earlier project was fair at best.
ABOUT THIS TRIPLE CHANGER PROJECT
In the beginning, I planned to apply similar joints technique from project above, to build a robot with a new alternate mode of course. However, things went south after a few days, as the limitations of the joints began to bug me.
Then I decided to build a tiger-like mechanical beast instead, that turned into a futuristic plane , shaped similar to my favorite G1 airborne Transformer... Misfire!
Oh... by the way, I made LEGO Misfire many years back (click here for more photos)
Since this project make use of the bike tires, I pondered over the shaping of the beast mode and decided to scrap the tiger mode in favor of a gorilla mode. It's the logical thing to do , proportion-wise. Another reason for this change is that I was unable to create decent looking paws for the feline mode anyway.
FUTURISTIC SPEEDSTER MODE
Initially the thickness of the vehicle body was a mere 2-stud before the huge tires were plugged in. This resulted in a really sleek vehicle when viewed from the top. Then I encountered problem fitting in the windshield. So the body was expanded to 4-stud wide.
FLIGHT MODE
Front wheels retracted to the bottom, forming the undercarriage cannons.
The final positioning of the retracted wheels is one of the design that took me quite some time to perfect.
Cannons are rotatable to aim towards targets below.
BEAST MODE
Transformation in mid-air made him looks like he's skydiving without a 'chute. He's gonna create a huge crater in this freefall!
I am still in a dilemma regarding the position of the printed slope piece on his chest. It's either here, or inside the windshield.
A widened vehicle body from 2 to 4 studs is a blessing is in disguise. Not just the bulk of the ape mode was increased, I am able to use the remaining sloped parts to "sculpt" his chest too.
The paws on the hind legs is the weakest link of this creation. Casually transforming him about would be fine though. The paws might pop out if you apply too much force.
The subtle red butt is purely accidental! Set 31114 has only a few red parts, and I need them exactly on this particular location to fold away the front wheels.
And talking about red butt, I accidentally caused a more prominent red butt on my Triple Change Apeface ape mode made few years ago.
GOING BANANAS POSES
The most versatile LEGO part from set 31114 was used in a humble manner: As the wrist joint.
Never tried to pose him bipedally before I started snapping the photos (assumed he can't, after seeing the small footprint vs huge bulk) . Glad he is able to pull this off!
BUILDING INSTRUCTIONS
Building Instructions in the form of a video tutorial , is located at the bottom of this page.
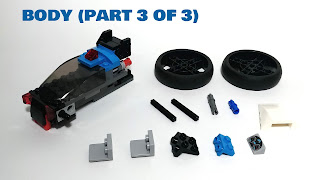
Before you get started, please sort your parts according to the photos below.
Arms
Legs
The Rest
VIDEO TUTORIAL
Video not showing? Click here please
Thank you for following my video tutorial! For more building instructions of my previous LEGO creations, click here please. Have fun!


No comments:
Post a Comment