


Part 2 will show transformation of my LEGO Astrotrain from space shuttle to robot mode.
New here? Please visit part 1 first to read about this project, and view photos of Astrotrain's locomotive and transformation to space shuttle mode.
Done? Great!
TRANSFORMATION FROM SPACE SHUTTLE TO ROBOT MODE


Detach wings from shuttle body, with the landing gears tagging along.

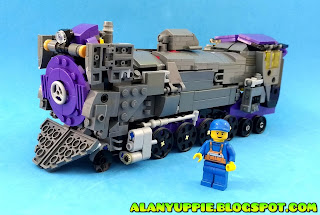
Unfold robot arms out of shuttle body and connect shoulder joints to merge with upper body. (yellow arrow)

The image above showed how the shuttle panels collapse to become robot waist, and double jointed mechanism allowed his iconic red deco on his waist to be rotated out.

Shift the panels up

Reconnect the wings back to the expanded panels. Finding ways to form the robot wings is one of the most challenging part of this project. The chunky wings must be positioned in such a way that they must not hinder the articulations of the arms and poseability of the robot mode.

Split the nosecone into two halves to form legs.

A bunch of swiveling actions here and there and everywhere. Shuttle panels concealing the thighs are shifted to the calves to add more mass to them.

Fold the purple panel aka train roof halves to form the feet. Notice the half circle hinge protrusion (near the red panel) acts as a connection peg to the purple panel.

And finally, unravel the robot head from the shuttle's rear. At this point, both the tailfin halves can be folded down to form his chest plate.
ROBOT MODE


From the side profile, you'll notice the locomotive chimney is pointing down beneath the chest plate. This is not my desired outcome actually , preferring it to be tucked inside the body (but this will cause the chest plate to buckle). Compromises, compromises!

Landing gears are one of the final components to be added in. Luckily the front landing gear ended up at the back of the robot without making a fuss.


MORE ACTION POSES
Oppps!!! I applied smooth tiles to cover up the gaps in shuttle mode and overdone it!

The pelvic joint range is reduced from the presence of parts marked in red. Removal of those bits will solve this issue.


WITH RIFLE


WITH OTHER BOTS

With 3rd Party Mechanic Studio legend class Astrotrain.

With LEGO Broadside, another one of my favorite G1 triple changers

PARTING THOUGHTS
If there's only one thing I would improve further on this LEGO Astrotrain.. that would be the position of the shuttle wings at the back of the robot mode. It's pretty low-hanging and should be raised up by about a cm / half an inch at the very least.
After spending 2 years just to put this project to a closure, I personally would not wish to drag this long again for my future LEGO projects. Shall remind myself not to start new projects in the midst of current ones ! And focus on completing what I started before moving on to the next one!
MORE TRIPLE CHANGERS PLEASE!
Sure! I had made a bunch of triple changers LEGO Transformers the past 10 years or more . Click here to view 'em. Enjoy!
No comments:
Post a Comment