INTRO
First thing first.............. HAPPY NEW YEAR 2014 everyone!
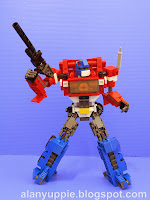
I think my MOC needs no introduction. its OPTIMUS PRIME!! What shall I say more to describe him? OK let me start by revisiting the Optimus Prime I made many, many years ago (link below):
Back then, that's as close as I can get trying to make a Powermaster Optimus Prime . But then again, it looked nothing like PM Prime except for the basic concept of Regular Prime + Trailer / Exo-skeleton = More badass Prime. But as the time goes by, I felt a need to do PM Prime greater justice since its one of my favorite G1 toy . Guess what, the whole thing (part 1 and part 2) took me a bit over 2 months and considering the complexity of this project and my life schedule, I'm giving myself a huge pat on the back for a job well done!
29/10/2021 Update! Official Video is up!
Click here if video is not showing.
Actually I plan to roll out PM Prime Part 1 before 2013 ended. This is because I felt "inadequate" for the second half of 2013 for not churning out new MOC (my MOCs made only from official LEGO sets doesn't count) , the last being Ironhide and Ratchet about 5 month ago. But then again I guess it doesn't matter. I am not in a hurry anyway and some projects demand their justified timeframe to complete. :)
Part 1 here is actually just a small appetizer of what's to come, so I don't have much to write now except some informative bits to explain some selected photos. Part 2 will be the main course which I hope to blow you guys away.
VEHICLE MODE
Quick trivia: The finishing touches to this MOC were two red flaps on the side of the truck (they were of grey "placeholder" parts throughout design) , courtesy of Ninjago Samurai Mech I unboxed just to harvest them.
I am hellbent on keeping the white stripes flowing at the side of the truck without being broken up by too many red gaps.
The hooks on the surface of the truck rear are connection points to the trailer.
Initially I wish to SNOT (Stud Not On Top) as much as possible, but here I must keep the studs on the sides of the windshield (read on explanations further down on the reason why)
Size comparison with the original Powermaster Optimus Prime.
RIFLE
It's a pleasant suprise to discover that this rifle can be connected to the back of the truck via the small gap, halfway through the photoshoot. I never planned for this actually. As you can see , recent official Optimus Prime toys seemed to have the rifle pegged in such a manner.
TRANSFORM!
Longer backheels are implemented to handle the weight of the upper body.
I've decided to use one-piece smokestacks rather building them using few cylinder parts. Besides looking good on the shoulders of bot mode, these smokestacks are practical too! But the bad thing is, they will be a hindrance in super mode (you'll soon see in part 2)
BOT MODE
So my insistence of having white stripes flowing as seamless as possible on the truck, caused the chest of the bot mode to inherit these white stripes also.
As mentioned earlier, the studded windshield frame must be kept as-is so that they can be folded even further up and as compact as possible to become the back kibble. IF those studs are padded with tiles (SNOT) , the position of the back kibbles will be very awkward due to restricted range of the hinges.
The ultimate stability test! Standing on one feet!
Since balljoint bricks are too bulky and doesn't come in red, I am implementing the shoulder joints using technic bricks and pins. Arm raising /complete rotation is possible, and some limited degree of spreading out and inwards too. But holding a rifle with a raised arm (and keeping the pose) is impossible. Solution? Swivel the smokestack to lean against the back kibble to hold the arm position in place.
AND NOW..... LIGHTING UP OUR DARKEST HOURS....
There's one limitation with Prime's arm articulation here. He can hold the matrix with both arms a bit higher around the chest level, but the weak shoulder hinges sag it down to the level as shown in the photo above. "Forcefully" raising the arms with the matrix on both hands will cause intense pressure to the Matrix, and break it into 2 parts, destroying it (and possibly, wakes up Unicron in the process).
FINALLY....


plz give a tutorial for this optimus prime
ReplyDeleteCan you give a tutorial for him?
ReplyDelete